Showing posts with label howto. Show all posts
Thursday, March 8, 2012

How To Pre-Order iPad 3 - The New iPad [How-To]

0 comments
Apple is the king of tablets after launched iPad 2. iPad2 sold out like hot cakes. After big hit of iPad2 Apple now launches the New iPad with great features than iPad2. Apple launches 2 models in New iPad that is Wi-Fi and Wi-Fi +4G.
Specification:
  • Height: 9.50" Width: 7.31" Depth: 0.37" Weight: 1.44 pounds (652 g)
  • 16GB , 32GB , 64GB depend upon your investment
  • Display 2048-by-1536-pixel resolution at 264 pixels per inch
  • 5-megapixel iSight camera
  • Wi-Fi (802.11a/b/g/n)
  • It has 42.5-watt-hour rechargeable lithium-polymer battery. You can Up to 10 hours of surfing the web on Wi-Fi, watching video, or listening to music.
Price:


  • Wi-Fi -  $499.00 16GB , $599.00 32GB , $699.00 64GB
  • Wi-Fi + 4G -  $629.00 16GB , $729.00 32GB , $829.00 64GB


How to Pre-Order Now:

1. The New iPad will be available in Apple Retail Stores starting March 16. But Apple has opened for Pre-Order. The New iPad - iPad 3 can pre-ordered by clicking this link here.


2. Select the Model you want.


3. Pre-order it.


Delivery of Pre-Ordered iPads:


Delivery of the Pre-Booked The New iPad  starts from March 16. So Pre-order soon.


Pre-Order for countries in Asia like India is not available yet.


Write here if you're facing any issues in pre-ordering.


Continue reading →
Saturday, March 3, 2012

How to download Windows 8 Original Consumer Preview with Free Serial Key [How-To]

0 comments
Recently Microsoft launched Windows 8 Consumer Preview Edition with Free Serial key open for all.


This Tutorial explains How to download Windows 8 Original Consumer Preview with Free Serial Key:


You can download windows 8 bootable ISO images on official Microsoft site through going to the following URL http://windows.microsoft.com/en-US/windows-8/iso  and also users can find the free Serial key for windows 8 consumer preview.


Universal Serial key for windows 8 consumer preview - NF32V-Q9P3W-7DR7Y-JGWRW-JFCK8 (or) If it is not working go to this official page and choose and select your versions.


To Install Windows 8 in your system, Please check out our tutorial for 


Tags: windows 8 consumer preview serial, windows 8 consumer preview Product, windows 8 consumer preview serial key, windows 8 consumer preview product key, windows 8 consumer preview activation code, windows 8 consumer preview activation key, windows 8 consumer preview registration, windows 8 consumer preview registration code, windows 8 consumer preview product code.
Continue reading →

How to Install Windows 8 Consumer Preview inside Virtual Box | Virtual Machine [How-To]

0 comments
1. First and foremost thing you need to do is to download a copy of the Consumer Preview – You’ll find the download links below:
2. We will be looking at how to install the Windows 8 Consumer Preview in a virtual box. It would be wise to install Windows 8 on a virtual box since, Windows 8 is still in its beta stage.You can download Virtualbox from here. You’ll see the following once you’ve installed it and started it up
3. The next step is to click on New up in the top left corner. Here you’ll enter in the name of your OS (Windows 8 Consumer Preview) and in the drop down menu below, do not select “Other Windows OS” – instead Windows 8 should be an option now, if not you probably need to update Virtual box. (If all else fails choose Windows 7)
4. Once you’ve completed this step, Virtual Box will ask you how much RAM you want to dedicate to Windows 8. The minimum requirements say you need 1GB, if possible go  for 1.5GB but if you’ve plenty of RAM on your system don’t be afraid to give it more. The more the better.
5. You’ll then be asked to set up a new virtual hard drive. This is where Windows 8 will be installed. You’ll need to allocate at least 20GB for this to work, so set at least that for it.The next thing you’ll be asked is what kind of virtual hard drive you want. It doesn’t really make a difference which one you choose, but go for the VHD.


6. After you’ve done this you’ll be asked if you want the drive to be dynamic or a fixed size drive. A dynamic drive will only expand up to the max size you set it as you need it. A fixed drive on the other hand will be the max size you assigned to it  i.e. 20GB as we set earlier.You’ll be asked to allocate the drive size after this.
7. Now once you’ve successfully completed the wizard, you’ll see that a new Windows 8 Consumer Preview machine has been added to virtual box. If you click on this and then select Start we can begin installing it.
8. Virtual box will ask you to select an ISO image to install Windows 8.You’ll select the one which we downloaded before.
9. Once you’ve located the ISO image then it’s a pretty straight forward process for installing Windows 8. Just remember to select a custom installation and not upgrade if you’re asked. Then you’ll choose the virtual hard drive that you created to install Windows 8 on.
10. And that’s really all there is too it! Once it’s all done you’ll have a working copy of the Windows 8 Consumer Preview running in a virtual box for you to play with!

Continue reading →
Tuesday, February 21, 2012

How To Apply EAMCET 2012 Online [How-To]

0 comments
EAMCET 2012 User Guide for Online Application Process


EAMCET 2012 Model Online Application form


Students are advised to read the above to two documents clearly to know How to apply for EAMCET 2012 Online.

Once you are clear with the above two documents,
 Click here to apply Online.

Please write here if you find any difficulties while regiestration, We'll try to resolve your doubts.
Continue reading →
Thursday, February 16, 2012

How to Start Private Stealth Mode Browsing in Google Chrome [How-To]

0 comments

Most of us know how to start a Private Browsing session in Mozilla Firefox. But it's very hard to find the actual button to start the Private browsing in Google Chrome.

But the real fact is, it's bit easier than Firefox to start Private browsing in Google Chrom.

This article explains you how to start Private Browsing/Incognito Browsing in Google Chrome.

For times when you want to browse in stealth mode, Google Chrome offers the incognito browsing mode. Here's how the incognito mode works:
  • Webpages that you open and files downloaded while you are incognito aren't recorded in your browsing and download histories.
  • All new cookies are deleted after you close all incognito windows that you've opened.
  • Changes made to your Google Chrome bookmarks and general settings while in incognito mode are always saved.
Tip: If you're using Chrome OS, you can use the guest browsing feature as an alternative to incognito mode. When browsing as a guest, you can browse the web and download files as normal. Once you exit your guest session, all of your browsing information from the session is completely erased.

Open an incognito window

  1. Click the wrench icon tools menu on the browser toolbar.
  2. Select New incognito window.
A new window will open with the incognito icon icon in the corner. You can continue browsing as normal in the other window.
You can also use the keyboard shortcuts Ctrl+Shift+N (Windows, Linux, and Chrome OS) and ⌘-Shift-N (Mac) to open an incognito window.
Browsing in incognito mode only keeps Google Chrome from storing information about the websites you've visited. The websites you visit may still have records of your visit. Any files saved to your computer will still remain on your computer.For example, if you sign into your Google Account on http://www.google.com while in incognito mode, your subsequent web searches are recorded in your Google Web History. In this case, to prevent your searches from being stored in your Google Account, you'll need to pause your Google Web History tracking.
Continue reading →
Thursday, February 9, 2012

How to tweet more than 140 Characters [How-To]

0 comments
140 is always a crazy number for most of the internet lovers, especially Twitter users. Twitter users sometimes go crazy if they've a big thing to express to this world. But Twitter stops users from doing this at the moment they try it, Because Twitter allows only 140 Characters per Tweet. So should all Tweeters need to squeeze their message within 140 Characters?


Hard Tweeters don't need to be panic. Here are some solutions to by-pass 140 Barrier.


TwitLonger
Topsy’s TwitLonger.com is the site I use via the Twitter desktop client, Tweetie, when I need to get beyond 140 characters. When you go over the character limit, a pop-up message asks if you want to post your “too long” tweet to TwitLonger. You can also of course write a longer tweet directly on the TwitLonger site, signing in with your existing Twitter account.
The site points out that your Twitter privacy settings are not reflected in Twitlonger, but it does recommend that you not use its services for sending direct messages. There are several Twitter-related web and mobile applications that support TwitLonger, including TweetList, Twizzle (iPhone/iPod Touch), Twitepad (iPad), and Touiteur (Android).
JumboTweet
JumboTweet is an easy to use web client for longer Twitter messages. As with TwitLonger, you simply log into the site using your current Twitter credentials. You can write as much text as you like, and a link to your extended text will be included in your tweet.
ezTweets
When 140 characters is not enough, eztweets is also a web client for longer tweets, but it has an added feature of allowing you to post your tweets to your Facebook account as well as to Twitter. ezTweets will take your longer tweets and split them into two parts.
TinyPaste
Okay, say you want to post a longer tweet that includes a list of technical instructions, or you want to highlight a long quote from a webpage. You might consider using TinyPaste for this purpose. With TinyPaste, you write your text, and format it the way you want. After you click the Submit button, you will get a URL link to your post that you can paste in your tweet. So essentially, TinyPaste is like writing longer text in your email or blog.
You can also password protect your linked post for say sending a direct private message to your Twitter contact. And on top of that, you can even have your extended post deleted after a specified amount of time.
TinyPaste also provides a bookmarklet and Firefox extension for quickly copying and pasting highlighted text on a webpage.
XLTweet
XLTweet is similar to TinyPaste but with less options. You can write longer posts in HTML format. The service will tweet the first 120 characters in your Twitter timeline and add a bit.ly short URL to link to the rest of the post. Your XLTweets will be automatically marked as “favorites” so you can readily find them.
But it's always best to keep your Tweets less than 140 Characters. Make your tweet short and make it easy for your Followers.

Short and T(S)weet

Continue reading →
Saturday, January 28, 2012

How to Score Good/High Marks in +2 (HSC Public Exam) 10th (SSLC Public )Tamil Nadu [How-To]

0 comments
How to Score Good/High Marks in +2 (HSC Public Exam) 10th (SSLC Public )Tamil Nadu [How-To]


Greetings:

First, All the best for the students who are going to face +2 Public Exam in the coming months. Life in +2 is said to one of the toughest phase for a student from Tamil Nadu who eagerly wait for a quality degree courses. Sometimes +2 becomes the life changer for many guys.

+2 Public Exam:

But for me +2 Public Exam is just another exam and students never need to worry regarding the weight and value that it contains. The only thing students need to do is just to confront the exam as if they don't have any other exam in future to write whatever they read in the whole 1 or 2 years. So +2 Public Exam is the ultimate one for the school students and it marks the end of the Schooling of each student in Tamil Nadu. Thus +2 becomes the finishing point of one's schooling.

Why +2 Public exam is given much importance:

Some years back Tamil Nadu higher secondary students had to face a competitive Entrance Exam to attend the Tamil nadu Engineering & Medical Counseling and the students was awarded ranks according to the score that they had got in the Entrance Exam. So the pressure was on Entrance Exam rather than Public Exam. But now it's not the case, Entrance Exam gone and Public exam is the only factor that decides the rank of the student for the Tamil nadu Engineering & Medical Counseling.

Do's and Don't's Study Tips (for all):

* First concentrate only on the core subjects Physics,Chemistry,Mathematics for Engineering Students and Physics,Chemistry,Biology for Medical Students.

* Get Blue Print for all these subjects and make yourself familiar with it.

* Make small notes/points of each topic you read in a Notebook ( Keep it safe )

            - This will help you to revise during the last 1 hour of the exam .
            - This will help a lot for One-mark Questions.

* Avoid group studies as no one will concentrate well in a part.

* Read completely even if you read one chapter
             - Blue Print will help you to select which chapters you need to read first.

* Never  mug up things that are in your book like taking a photo with a camera.

Do's and Don't's Study Tips (for Centum Aimers):

* Prepare a bunch of One-mark questions in each chapter - consolidate it and make it in a separate Notebook.

* Understand the concepts rather than memorizing it - This will help in one-mark questions.

* Solve all the problems in the book - be fast enough to do it.

* Never leave even a single paragraph thinking that you can leave it in choice - This will hit you in One-mark.

* Review all your old answer sheets of unit test that you wrote in your exams and identify your weak area.

* Clearly read all the labeling parts of a Diagram or Figure.

Special Maths Study Tips:


* Complete all the one-mark questions given at the last of the book.

* Understand all the derivation of Formulae in each chapter.

* Read the first 2 - 3 pages description given in the start of each chapter.

* Theorems and Derivations are more important to complete all the one-marks correctly.

Writing Tips ( for all ) :


* Always write in the same way as question paper's structure.

* Always begin with One mark
      - because if you leave one mark for last and you didn't get time then you lose many easy marks.

* Leave the one marks blank that you don't know and you can finally write something in those things.

* Always start a new section in a fresh page, so plan according while writing.

* Inside a section ( like 5 marks or 10 marks ) you can interchange the question answers order.

* Always clearly mention the question number
       - never forget to mention a question number - it's very important.

* Always complete the diagrams in each question with labels and never make it at last time.

* Select the Problem questions to write first as you can save more time.

* Set a particular time for each question and never exceed it. If you feel you are exceeding it , leave that and start a new question - you can come back there at last.

* Leave a good space after each word and each line and make your paper looking good.

* Never strike a whole or half a page - that will put you in trouble by asking Invigilator to sign your paper.

Psychological Tips:

* Study early in the morning.

* Never sleep late in the night especially during Exam Days.

* Eat well before going to exam -  Try to have some chocolate after food.

* Drink water well during study holidays. This will prevent your body from getting more heat.

* Watch TV sometime for relaxation but never watch Movies or Cricket Matches.

* Never ask any of your friends how much they've studied.

* Avoid oily food before going to exam.


Ultimatum:

Hard work never Fails - Read Hard - Write Hard -
Success will chase you.

Continue reading →
Wednesday, December 28, 2011

How to Buy/Order/Purchase RIM's Blackberry Playbook @ 50 percent offer in India [How-To]

0 comments


How to Buy/Order/Purchase RIM's Blackberry Playbook @ 50 percent offer in India [How-To] :

Buy Now: Blackberry Playbook online @ more than 50% offer - Only in India

* Letsbuy.com Blackberry Playbook 16 GB @ Rs. 13,249 - Order Now

* Flipkart.com Blackberry Playbook 16GB with FREE Home Delivery @ Rs. 13,249 Delivered in 4-6 business days. - Order Now

* Flipkart.com Blackberry Playbook 32GB with FREE Home Delivery @ Rs. 15,990 Delivered in 4-6 business days. - Order Now

* Flipkart.com Blackberry Playbook 64GB with FREE Home Delivery @ Rs. 24,990 Delivered in 4-6 business days. - Order Now


* Infibeam.com Blackberry Playbook 16GB with FREE Home Delivery @ Rs. 18,790 Ships in 3-4 business days. - Order Now

* Infibeam.com  Blackberry Playbook 32GB with FREE Home Delivery @ Rs. 22,990 Ships in 3-4 business days. - Order Now

* Infibeam.com  Blackberry Playbook 64GB with FREE Home Delivery @ Rs. 28,590 Ships in 3-4 business days. - Order Now

Continue reading →
Sunday, December 18, 2011

How to Buy/Order/Purchase Aakash Tablet Online [How-To]

0 comments
How to Buy/Order/Purchase Aakash Tablet Online :
Here is the series of steps to show how can you  Buy/Order/Purchase Aakash Tablet Online  :
Step 1
Visit www.aakashtablet.com and click on order now to purchase Aakash tablet.


Step 2
For booking Aakash Tablet:

You will see a form in which you have to fill your name, last name , email, mobile number, shipping address, city , state and pin code. These all are compulsory fields.
Apart from above mentioned fields you will also see a query field, which is not mandatory, where you can ask your question.


Result :

Upon Clicking Order Now, Users will get a Confirmation message with Order number like this.


Continue reading →

How to Pre-Book UbiSlate 7 - The upgraded version of Aakash [How-To]

0 comments
How to Pre-Book UbiSlate 7 - The upgraded version of Aakash:
Here is the series of steps to show how can you Pre-Book UbiSlate 7 - The upgraded version of Aakash :
Step 1
Visit www.aakashtablet.com and click on pre-book if you want to pre-order the upgraded version of Aakash tablet, Ubislate 7.
Step 2:
Here you will get a form where you have to fill your name, last name, email, mobile number, shipping address, city, state and pin code. These all are compulsory fields and Finally Query. 


Result :

Users will get a confirmation message which states, "The commercial version of the Akash UbiSlate 7 would be launched in early weeks of December. After the commercial launch we would get in touch with you to deliver your device as soon possible."

Continue reading →
Sunday, November 6, 2011

How to Bypass or Remove a BIOS Password [How-to]

0 comments
A BIOS password is a protection measure that can be used to stop someone powering up a computer system or making changes in some of the computers most sensitive areas. Many big name computer manufacturers such as Dell and HP lock the customers out of this area because they don’t want the customer changing anything and potentially damaging the machine (which the manufacturer may have to warranty). However, when someone like a computer technician or hardware enthusiast needs to make some hardware changes to the computer, they will need to access the BIOS. Here are some methods to bypass or remove a BIOS password.

NOTE: Do not try to guess the password on a passworded Hard Drive. 3 wrong guesses will often result in the information on the hard drive being lost forever.
How to Bypass or Remove a BIOS Password by Removing the CMOS Battery:
The simplest way to remove a BIOS password is to simply remove the CMOS battery. A computer will remember its settings and keep the time even when it is turned off and unplugged because these parts are powered by small battery inside the computer called a CMOS battery. If we pull out this battery, the computer will forget alot of its hardware settings, including its BIOS password. This should not be performed on Laptops if you are not experienced working with laptop hardware.
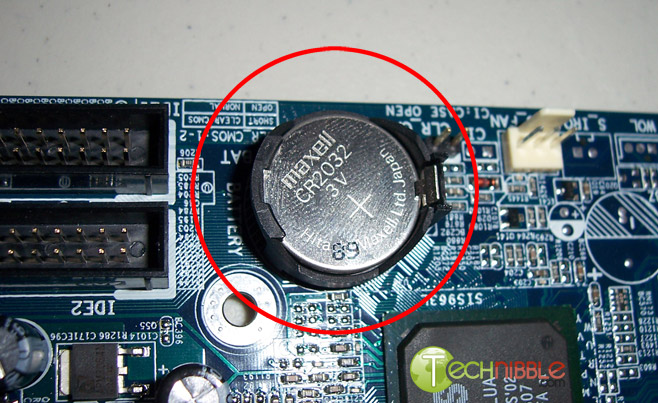
Finding the CMOS BatteryAnyway, open up the computer case using a screw driver and locate the flat, circular and metallic CMOS battery. It should look something like the picture to the right. Some computers have this part standing upright.
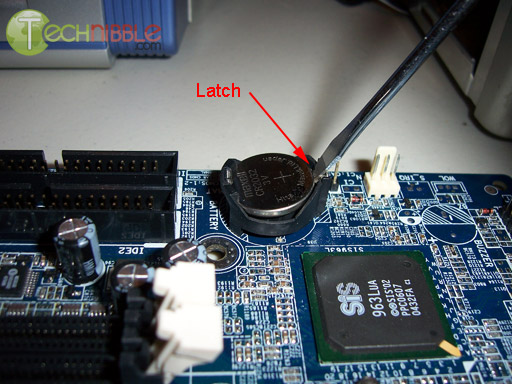
Once you have located it, observe how the latches are holding it. There are many different ways to remove a CMOS battery but the most common way on newer computers can be seen in the picture below.
Removing the CMOS Battery
Make sure to power down the computer, unplug the power cables and unplug any USB devices if they are powered. The computer must not be able to get power from anywhere for this to work. Take out the CMOS battery and wait 10 – 25 minutes before putting it back in. The reason for this wait is because the computer can still store power in its capacitors even though everything is unplugged. The waiting period allows enough time for them to discharge.
Plug everything back in, power up the computer and enter the BIOS again. If everything went well there should be no more password. In some cases, if you get weird error messages during bootup now, you will need to goto “Load BIOS Defaults” in BIOS and save the changes to fix them.
If this method didn’t work, try one of the methods below.
How to Bypass or Remove a BIOS Password using Software:
!BIOS is a freeware utility which is designed to be a whole BIOS and security suite. It has the ability to decrypt the passwords used in some of the most common BIOS makes such as Award, Phoenix, American Megatrends, IMB etc..
It also has the ability to brute force the password (known as “blasters”). However, this method is dangerous and can result in some unexpected and unwanted results.
Note: Because of this applications password cracking abilities, some antivirus software may report it as a virus/trojan. This is a false positive.
To start using !BIOS, reboot your computer and take note of the BIOS type and version you are running. For example, If your motherboard uses Award BIOS you should look for the text “Award Medallion BIOS 6.0″ or something similar.
Download !BIOS from here and save it to your desktop. Then, open a DOS command windows by going toStart > Run and type: cmd
Once you see a black screen in front of you, type: cd desktop
You should now see something like: C:\Documents and Settings\YourUserName\Desktop>
Now type the name of the file you just downloaded, if you haven’t changed the name just type in: bios320.exe
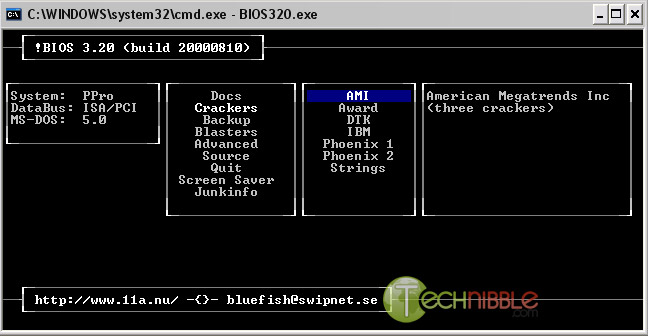
!BIOS - Decrypting a BIOS Password
Use the down arrow and choose “Crackers” and then press the right arrow. Using the up and down arrows, select the BIOS that the motherboard is using and press Enter.
You should now see a menu asking what you want to crack, in most cases its the Supervisor or System Passwords you want to crack, so press the 1 key on your keyboard. It will then show you another menu asking how you want it to be cracked. Option 1 is pretty good so try that first by pressing the 1 key on your keyboard. You should now have your BIOS password.
Reboot the computer, enter the BIOS and try it out.
How to Bypass or Remove a BIOS Password using the manufacturer backdoor password:
On many computers (especially old ones), computer manufacturers build in backdoor passwords for their own technicians to use so they can access the BIOS when the hardware is being serviced. Here are some of the ones that have been reported. You may need to try quite a few passwords before you find one that works
These passwords are CaSe SeNsItIve.
AMI BIOS Backdoor Passwords:
  • A.M.I.
  • AAAMMMII
  • AMI
  • AMI?SW
  • AMI_SW
  • BIOS
  • CONDO
  • HEWITT RAND
  • LKWPETER
  • MI
  • Oder
  • PASSWORD
Award BIOS Backdoor Passwords:
  • (eight spaces)
  • 01322222
  • 589589
  • 589721
  • 595595
  • 598598
  • ALFAROME
  • ALLY
  • ALLy
  • aLLY
  • aLLy
  • aPAf
  • award
  • AWARD PW
  • AWARD SW
  • AWARD?SW
  • AWARD_PW
  • AWARD_SW
  • AWKWARD
  • awkward
  • IOSTAR
  • CONCAT
  • CONDO
  • Condo
  • condo
  • d8on
  • djonet
  • HLT
  • J256
  • J262
  • j262
  • j322
  • j332
  • J64
  • KDD
  • LKWPETER
  • Lkwpeter
  • PINT
  • pint
  • SER
  • SKY_FOXSYXZ
  • SKY_FOX
  • syxz
  • SYXZ
  • TTPTHA
  • ZAAAADA
  • ZAAADA
  • ZBAAACA
  • ZJAAADC
  • Russian Award BIOS Passwords:
  • %øåñòü ïpîáåëîâ%
  • %äåâÿòü ïpîáåëîâ%
Phoenix Backdoor BIOS Passwords:
  • BIOS
  • CMOS
  • phoenix
  • PHOENIX
Other Manufcaturers Backdoor Passwords: (manufacturer name – password)
  • VOBIS and IBM – merlin
  • Dell – Dell
  • Biostar – Biostar
  • Compaq – Compaq
  • Enox – xo11nE
  • Epox – central
  • Freetech – Posterie
  • IWill – iwill
  • Jetway – spooml
  • Packard Bell – bell9
  • QDI – QDI
  • Siemens – SKY_FOX
  • SOYO – SY_MB
  • TMC – BIGO
  • Toshiba – Toshiba
Continue reading →

Followers

Aco

Related Posts Plugin for WordPress, Blogger...